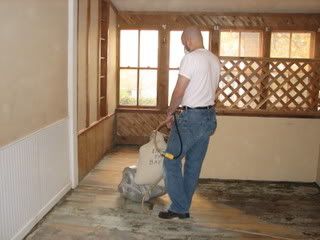
Here's the floor before we started the sanding. I had stripped most of the old carpet adhesive off the floor prior to this weekend, as I really didn't want anyone breathing 20-yr-old adhesive dust. I'm glad I did that step. Even so, it was a giant mess. Our shop vac got a real workout. Thank the heavens for 3 mil. plastic and tape. At least I was able to spare the rest of the house from the dust by sealing off the doorways.

This is my husband, doing the first pass with the sander. We started with a 45-degree angle, as the boards were cupped in spots. Not too bad, though, considering the floor spent its first few years as a porch (we think). It was clear, however that there was never any varnish on this floor. No one gots pictures of me working the edge sander or the belt sander ot the sanding block-on-a-pole, but I did lots of sanding too. We were both thoroughly sore after all that.
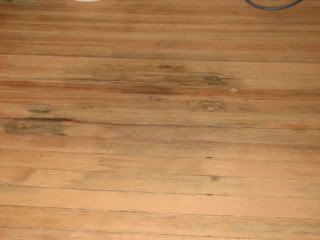
After all the sanding was done, there were still several dark spots and stains. I assume those were courtesy of the pets who have called this place home over the years. I tried bleaching one of the spots, but it was pretty obvious that the stains weren't going to go without a hell of a fight. So we decided to call them "provenance" and leave them. The room will be filled with furniture anyway -- so we'll just plop things on top of the worst spots. I like to cheat like that.
And here is the "after" shot. We covered it with 2 coats of 2-lb. cut of amber shellac, then a third coat of 3-lb. clear. I am in love with the color that the shellac gave the pine.
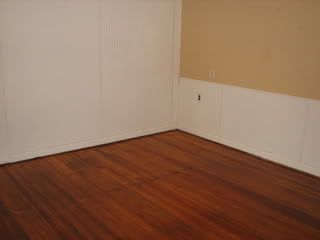
Why shellac you ask? Well, I didn't want to use polyurethane--it's too toxic, and I also wanted something renewable. So, inspired by This Old Crackhouse and Life in the Prairie Box, I decided to give it a whirl. I'm rather in love with it. I hope it is durable enough for our family. It's a pretty "rustic" floor, so absolute perfection isn't really expected (or needed, either).
I learned lots of things about floors and floor machines and shellac through this process. I'll try to get to those lessons very soon. Right now, I need to go move everything backinto the room. Our reupholstered furniture is coming home on Thursday, so I have lots to do to be ready.


Oh! It's so pretty Robin! I am insanely jealous. Just out of my mind. I deplore my carpet from 1972. It is beyond disgusting. Why oh why didn't they have hardwood under there?
ReplyDeleteWell, you're lucky, and you have a beautiful floor to look at as payment for all your hard work.
That is gorgeous! My old house had tarpaper attached to the glue. I have no idea why. I sold the house before I got a chance to finish the floors. Aren't you glad you didn't paint?
ReplyDelete